
 Last updated 3 years ago
If you have ever worked with the Windows operating system, you might have come across the terms "client area" and "non-client area." These terms refer to specific regions of a window's graphical user interface (GUI). Understanding the distinction between these two areas is essential for developers and users alike. In this article, we will explore what the client area and non-client area are in Windows and how to take screenshot.
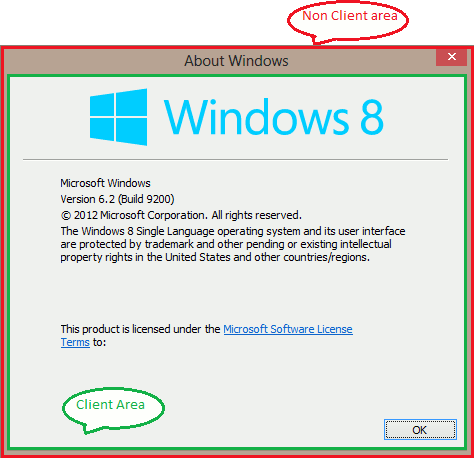
Client Area: The client area, sometimes referred to as the content area, is the main region of a window where application-specific content is displayed. It is the area where you can interact with the application's user interface elements such as buttons, text fields, and other controls. In simple terms, it is the space inside the window borders where the application's content resides.
Non-Client Area: On the other hand, the non-client area is the region surrounding the client area of a window. It includes the window's title bar, borders, minimize/maximize buttons, and close button. The non-client area is typically controlled by the operating system and its appearance may vary based on the themes chosen by the user.
Users may find the need to capture screenshots of the client and non-client areas in Windows. It is often necessary for various purposes such as documentation, sharing information, and technical support.
To capture the active window you are currently working in, you can use the key combination Alt + PrintScreen. This action will copy the screenshot to your clipboard. To store the screenshot as an image file, you can paste it into any image-editing program such as Paint, GIMP, or Photoshop. Using Alt + PrintScreen enables you to capture a screenshot that includes the window borders, title bar, and buttons like minimize, maximize, and close.
To capture a screenshot specifically of the client area within a window, you can utilize a simple tool for Windows. Vovsoft Window Resizer, which not only allows you to resize windows to specific dimensions but also provides the capability to capture client-area screenshots.
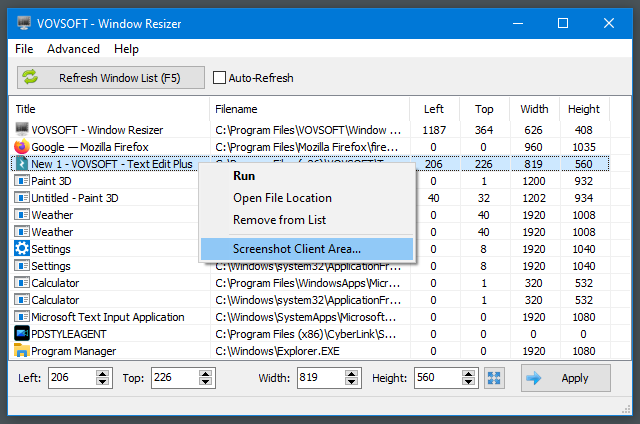
By right-clicking on any item in the list and choosing the "Screenshot Client Area" option, you can take client area screenshots of any running window.


